HTML5 Tutorial:

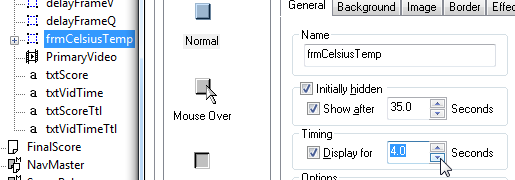
Preview the video and take a note of the times at which you want your events to happen. You can then select each object you want to show at a particular time and set the Display after option (on the General tab of the Properties dialog) to show each object at the correct moment, and also set a time to Display for so it disappears at the correct moment....

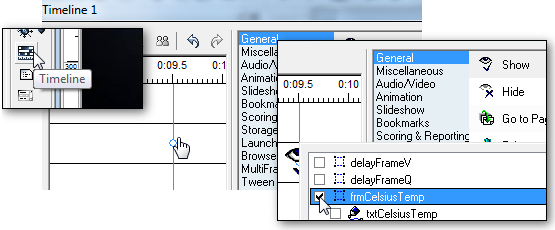
...alternatively add a Timeline object to your page and add actions to that at the appropriate times to show and hide the objects you want.

Further details on Timelines.
For many purposes this mechanism will suffice but users with Opus Pro have a more sophisticated alternative.
The problem with timing the interactivity using standard Opus actions is that these are based on Opus publication timing, while playback of the video may be interrupted by poor connections and buffering. For more precise timing you need to use the exact position of the video to launch the chosen additional element. This is possible using JavaScript in Opus Pro and the sample provides all the scripts you require so you can use this feature even if you are not a programmer or not familiar with OpusScript or JavaScript.
HTML5 video has a property called currentTime which lets you find out which point (in seconds) the video has reached. This means that making a variable equal myVideo.currentTime will get the current position of the video.
We will use a Javascript action (from the Programming tab) to put this into an Opus variable called currTime which we can display on screen or use elsewhere in the publication.
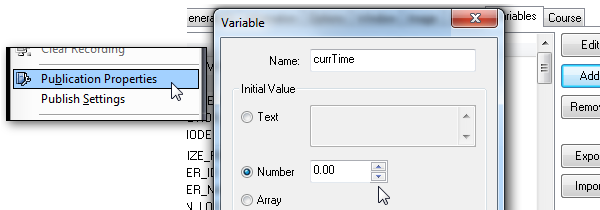
Go to the Variables tab of Publication Properties and Add a new Publication Variable with that name and set it as a number with the initial value of 0.

We want to check the video position regularly so we will attach our action above to a Ticker trigger which runs the action every tenth of a second. Add a Ticker trigger to the page your video is on.

Then go to the Programming tab and add a JavaScript action to your trigger. You will now need to type the script required into the box provided.
When writing scripts to control video on a web page you have to be a very specific to ensure you identify the video object you want the time for. In standard HTML5 JavaScript this is done using document.getElementbyID or similar. For Opus objects you have to use _DWPub.PageName.VideoObjectName.videoElement() to make sure the browser knows exactly which object you want. And similarly you need to use _DWPub to reference the Opus Publication variable currTime which you set up earlier if you want to use it in a JavaScript action as we do.
So the JavaScript Action in Opus needs to be:

If you don't need to understand the script and simply want to use it, then all you need to know is that in the above example you edit VideoPage to match the Opus page name on which you have placed your video and change PrimaryVideo to the name you have given the video object. (Make sure you don't use spaces or punctuation in these names as these are reserved characters which will break the script and you'll just get a black page - use underscores instead.)
Now that an Opus variable has the current time in we can check that to see if it has reached the point where we want to show an Opus object.
Again we want to do this regularly so we'll attach the action to the Ticker trigger we created above.
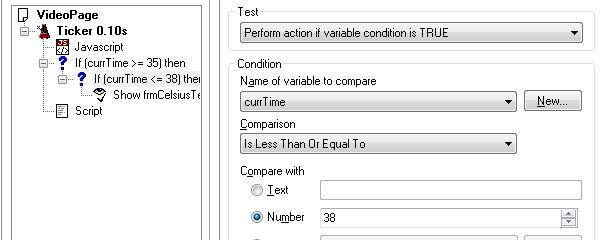
By timing the video we know we want to display the Celsius Temperature annotation between 35 secs and 38 secs. We must remember that the computer is working in micro-seconds and doing many functions at the same time so our ticker timer might not coincide exactly with 35.000000 seconds so we can't use Equals as our condition but instead we use Greater Than Or Equal to.
We can use an If action from the Programming tab and check that the video has passed the 35 second mark as illustrated.


Alternatively we can write this as OpusScript by adding a Script from the Programming tab and typing the function into the script object. In this case we can combine the conditions in one by saying if the current time is greater than 35 but also less than 38 (that is Greater Than or Equal to 35 AND Less Than or Equal to 38) we can show the frame. Note that the syntax for AND in OpusScript is "&&".

In both cases you will also need to add an Else statement to Hide the object again once the If condition is no longer met.
We can use a similar technique to display the Questions but there are three complications - we don't know how long the user will take to answer the questions and we want to pause the video while they do (as detailed in the next section). Therefore setting an end time limit based on the video will not work. However, as the user will have to click on the Confirm Answer button on the final question we can use that to hide the questions.
So in this case we need the start time (41 seconds) when we want to show the questions and the user will hide them (we have included an end time of 48 seconds just for completeness). We could use an If action from the Programming tab again but for the purposes of this tutorial we have used an OpusScript object and so we type the script into the box provided.

There is a problem with our solution however. The action to show the Questions is on a Ticker trigger so once the video has reached the alloted time of 41 seconds it will keep showing the Questions which will mean Q1 will keep appearing every tenth of a second and the user will never be able to answer Q2.
Thus we need to make the action just occur once which we can do by setting another variable as soon as Q1 appears and including the state of that variable in our conditional If statement. In this example we have create a new variable called QShown and set the initial value to false. Then as soon as we have shown the Questions we can set it to true and we know we don't need to show them again. Thus our script becomes:

There are other issues with timing which are more to do with usability. For example, when the user clicks the Confirm Answer buttons in our questions there is little or no time to register the answer feedback as the actions we created immediately hide the question and show the next one. What would be better for the user is to delay the Hide and Show actions or tell the process to Wait. Unfortunately JavaScript does not include a wait or delay function.
The solution is simple - we attach the Show and Hide actions to a separate "invisible" object which the Confirm Answer displays. The actions are attached to an On Show trigger which only occurs once the object is fully visible, so by adding a transition to the object which takes as long as the delay we want, we will postpone the On Show trigger until that is complete and created a wait function. In our example we have used a frame called delayFrameQ to create a delay between the two questions and delayFrameV to delay the video restart - because the frames do not have any content or properties they do not show up on screen but the actions are still processed.
Examine the actions on the Confirm Answers button and the delay frame objects in the sample for further details.
Finally we have added an action to move on to a score page when the video finishes.
We know the video is around 93 seconds long. So we can add an If statement to see if the current position of the video is greater then 50 secs and then add a Goto page action to move on to the next page. In the example provided we have put this in the script object but you could also use the standard If action as we did above with the Celsius temperature annotation.
In our example publication we have moved on to a simple page displaying the user's score called FinalScore.

As an additional element to the sample we have also included a conditional action on an On Show trigger for the page which checks to see if the user's score which Opus has automatically calculated is greater than 80% and displays either a congratulations or revision message accordingly.

In the next section we summarise how to use these properties to control the video and pause it beneath our quiz.
how to create interactive HTML5 video with Opus Pro - tutorial part 4