OpusScript Tutorial:
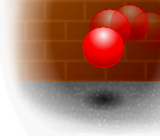
In the first part of this tutorial, we learned how to make an object act as though under the influence of gravity. We also made the object bounce realistically upon the 'floor' of the publication, gradually losing momentum with each bounce until the ball came to rest.
However, we have so far only dealt with vertical motion and it would be interesting to see what happens if we allow the ball to move horizontally and bounce off the 'walls' of the publication.
Again, if you encounter any problems following the steps in this tutorial, or find that your publication does not behave in the expected fashion, please feel free to download the completed sample from the bottom of this post.
Please first ensure that you have the publication created in Step 1 loaded into Opus Pro 04 or Opus Pro XE 04. If you have deleted this, simply download the completed example from the link provided in Step 1 of this tutorial and load this into Opus.
Now double-click on the existing Script Object to view its contents. You should see the following:
floor = 575
speed = 0
gravity = 1
bounce = 0.9
while (true) {
  speed = speed + gravity
  Ball.MoveY(speed)
  pos = Ball.GetPosition()
  if (pos.y > floor) {
    Ball.SetPositionY(floor)
    speed = speed * -bounce
  }
  wait(0.01)
}
Please ensure that this code matches what you see in your Script Object. If not, please make any necessary changes. All being well, please continue to the next step.
At present, we only have one 'speed' variable which governs the vertical speed of the object and increases over time due to the force of gravity. However, in order to give the ball a horizontal speed and control this velocity, we will need to create a new variable named 'speedX':
floor = 575
speedX = 0
speed = 0
gravity = 1
bounce = 0.9
while (true) {
  speed = speed + gravity
  Ball.MoveY(speed)
  pos = Ball.GetPosition()
  if (pos.y > floor) {
    Ball.SetPositionY(floor)
    speed = speed * -bounce
  }
  wait(0.01)
}
Let's also rename the existing 'speed' variable to 'speedY' to help us differentiate between the two:
floor = 575
speedX = 0
speedY = 0
gravity = 1
bounce = 0.9
while (true) {
  speed = speed + gravity
  Ball.MoveY(speed)
  pos = Ball.GetPosition()
  if (pos.y > floor) {
    Ball.SetPositionY(floor)
    speed = speed * -bounce
  }
  wait(0.01)
}
As we have renamed a variable which was already used by certain actions, we will need to edit these actions to use this new 'speedY' variable. We will therefore need to change:
speed = speed + gravity
to read:
speedY = speedY + gravity
Now change the line:
Ball.MoveY(speed)
to read:
Ball.MoveY(speedY)
Finally, change the line:
speed = speed * -bounce
to read:
speedY = speedY * -bounce
The Script Object should now read as follows:
floor = 575
speedX = 0
speedY = 0
gravity = 1
bounce = 0.9
while (true) {
  speedY = speedY + gravity
  Ball.MoveY(speedY)
  pos = Ball.GetPosition()
  if (pos.y > floor) {
  Ball.SetPositionY(floor)
  speedY = speedY * -bounce
  }
  wait(0.01)
}
Although we have defined a variable to control horizontal speed, there are currently no actions telling the ball to move horizontally - only a MoveY() action which moves the ball vertically. Let's change this action to a Move() action which moves the ball both horizontally (by the value of 'speedX') AND vertically (by the value of 'speedY'):
floor = 575
speedX = 0
speedY = 0
gravity = 1
bounce = 0.9
while (true) {
  speedY = speedY + gravity
  Ball.Move(speedX,speedY)
  pos = Ball.GetPosition()
  if (pos.y > floor) {
    Ball.SetPositionY(floor)
    speedY = speedY * -bounce
  }
  wait(0.01)
}
Now preview the publication. You should find that the ball still drops directly downwards to the floor. This is because the horizontal speed in the variable 'speedX' is initially set to zero and there are no actions to change this value. Let's give the speedX variable an initial value of 10 to see how the ball responds:
floor = 575
speedX = 10
speedY = 0
gravity = 1
bounce = 0.9
while (true) {
  speedY = speedY + gravity
  Ball.Move(speedX,speedY)
  pos = Ball.GetPosition()
  if (pos.y > floor) {
    Ball.SetPositionY(floor)
    speedY = speedY * -bounce
  }
wait(0.01)
}
Now preview the publication. The ball should now drop down and to the right and continue to move horizontally as the ball bounces.
One problem with our present publication is that the ball disappears off the right-hand side of the page. We therefore need to add 'walls' to our publication to prevent this and reverse the ball's direction to simulate a bounce. Thankfully, we can achieve this using the same techniques used to create our existing floor.
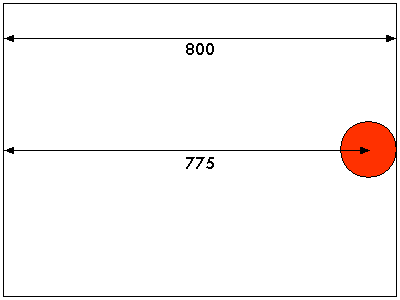
When the ball is situated against the right-hand edge of the publication, its horizontal position is actually 775 as the GetPosition() calculates the position from the centre of the ball, as shown below:
Similarly, when the ball is positioned at the left-hand edge of the publication, its position is not zero but 25 (the distance from the left-hand edge of the ball to its midpoint), as shown below:
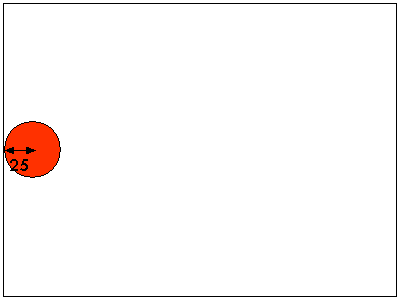
We therefore need to create two new variables - let's call them 'floorX1' and 'floorX2' - which are set to 25 and 775 respectively:
floorX1 = 25
floorX2 = 775
floor = 575
speedX = 10
speedY = 0
gravity = 1
bounce = 0.9
while (true) {
  speedY = speedY + gravity
  Ball.Move(speedX,speedY)
  pos = Ball.GetPosition()
  if (pos.y > floor) {
    Ball.SetPositionY(floor)
    speedY = speedY * -bounce
  }
  wait(0.01)
}
Although the ball cannot currently bounce higher than its starting position, this may be possible once we have implemented a way of throwing the ball around the page. It may therefore be a good idea to give our publication a 'ceiling' to prevent the ball moving off the top of the screen. When the ball is positioned at the top edge of the publication, its vertical position is 25, as shown below:
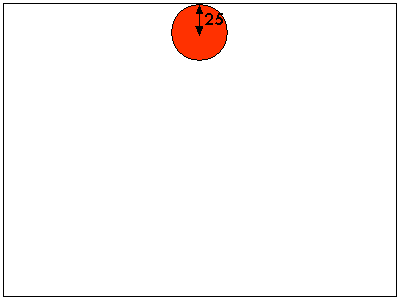
We therefore need to define a new variable - we'll call it 'floorY1' - set to 25:
floorX1 = 25
floorX2 = 775
floorY1 = 25
floor = 575
speedX = 10
speedY = 0
gravity = 1
bounce = 0.9
while (true) {
  speedY = speedY + gravity
  Ball.Move(speedX,speedY)
  pos = Ball.GetPosition()
  if (pos.y > floor) {
    Ball.SetPositionY(floor)
    speedY = speedY * -bounce
  }
  wait(0.01)
}
Now let's change our existing 'floor' variable to 'floorY2' to match the naming scheme:
floorX1 = 25
floorX2 = 775
floorY1 = 25
floorY2 = 575
speedX = 10
speedY = 0
gravity = 1
bounce = 0.9
while (true) {
  speedY = speedY + gravity
  Ball.Move(speedX,speedY)
  pos = Ball.GetPosition()
  if (pos.y > floor) {
    Ball.SetPositionY(floor)
    speedY = speedY * -bounce
  }
  wait(0.01)
}
As we have renamed a variable already used by actions, we will also have to change the line:
if (pos.y > floor) {
to read:
if (pos.y > floorY2) {
and change the line:
Ball.SetPositionY(floor)
to read:
Ball.SetPositionY(floorY2)
The modified script object should now look like the following:
floorX1 = 25
floorX2 = 775
floorY1 = 25
floorY2 = 575
speedX = 10
speedY = 0
gravity = 1
bounce = 0.9
while (true) {
  speedY = speedY + gravity
  Ball.Move(speedX,speedY)
  pos = Ball.GetPosition()
  if (pos.y > floorY2) {
    Ball.SetPositionY(floorY2)
    speedY = speedY * -bounce
  }
  wait(0.01)
}
We have now defined all four walls of the publication as follows:
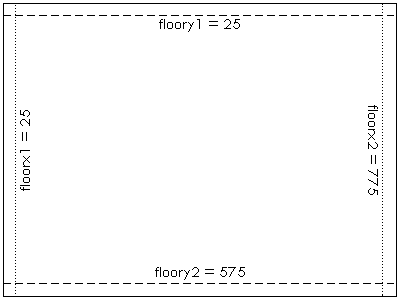
We now need to use If statements to check whether the current vertical position of the ball (pos.y) is less that 'floorY1' or greater than 'floorY2' (which we are already checking). We also need to check whether the horizontal position of the ball (pos.x) less than 'floorX1' or greater than 'floorX2'.
Let's tackle the left-hand wall first. Add the following code after the line [b]pos = Ball.GetPosition()[/b]:
if (pos.x < floorX1) {
As the ball may be moving quite quickly, it is possible that the last Move() action has placed the ball past the left-hand edge of the publication. We therefore need to reposition the ball back inside the publication at the left-hand edge:
Ball.SetPositionX(floorX1)
We now need to reverse the horizontal direction of the ball. However, we do not want the vertical direction of the ball to be reversed, otherwise a ball which is incoming from the top-right would end up bouncing back up to the top-right which you would not expect from a collision with a vertical wall. Instead, we need to ball to continue moving down whilst its horizontal motion is reversed. The following diagram should hopefully make this clear:

As with the original floor we created in Step 1, we should assume that the collision with the wall has absorbed some the ball's energy and slightly reduce the horizontal speed. The easiest way to do this and simultaneously reverse the ball's horizontal direction would be to multiply the current speed of the ball 'speedX' by -bounce. Let's try this:
speedX = speedX * -bounce
Now close the If statement using a right curly bracket:
}
The Script Object should now read:
floorX1 = 25
floorX2 = 775
floorY1 = 25
floorY2 = 575
speedX = 10
speedY = 0
gravity = 1
bounce = 0.9
while (true) {
  speedY = speedY + gravity
  Ball.Move(speedX,speedY)
  pos = Ball.GetPosition()
  if (pos.x < floorX1) {
    Ball.SetPositionX(floorX1)
    speedX = speedX * -bounce
  }
  if (pos.y > floorY2) {
    Ball.SetPositionY(floorY2)
    speedY = speedY * -bounce
  }
  wait(0.01)
}
Now let's detect a collision with the right-hand wall:
if (pos.x > floorX2) {
Position the ball back inside the publication aligned to the right-hand wall:
Ball.SetPositionX(floorX2)
Then reverse and reduce the ball's horizontal speed by multiplying speedX by -bounce:
speedX = speedX * -bounce
Don't forget the right curly bracket!
}
Your code should now resemble the following:
floorX1 = 25
floorX2 = 775
floorY1 = 25
floorY2 = 575
speedX = 10
speedY = 0
gravity = 1
bounce = 0.9
while (true) {
  speedY = speedY + gravity
  Ball.Move(speedX,speedY)
  pos = Ball.GetPosition()
  if (pos.x < floorX1) {
    Ball.SetPositionX(floorX1)
    speedX = speedX * -bounce
  }
  if (pos.x > floorX2) {
    Ball.SetPositionX(floorX2)
    speedX = speedX * -bounce
  }
  if (pos.y > floorY2) {
    Ball.SetPositionY(floorY2)
    speedY = speedY * -bounce
  }
  wait(0.01)
}
We finally need to check whether the ball has reached the ceiling:
if (pos.y < floorY1) {
Position the ball back inside the publication aligned to the ceiling:
Ball.SetPositionY(floorY1)
Reverse and reduce the ball's vertical speed:
speedY = speedY * -bounce
And close the If statement:
}
The code should now read:
floorX1 = 25
floorX2 = 775
floorY1 = 25
floorY2 = 575
speedX = 10
speedY = 0
gravity = 1
bounce = 0.9
while (true) {
  speedY = speedY + gravity
  Ball.Move(speedX,speedY)
  pos = Ball.GetPosition()
  if (pos.x < floorX1) {
    Ball.SetPositionX(floorX1)
    speedX = speedX * -bounce
  }
  if (pos.x > floorX2) {
    Ball.SetPositionX(floorX2)
    speedX = speedX * -bounce
  }
  if (pos.y < floorY1) {
    Ball.SetPositionY(floorY1)
    speedY = speedY * -bounce
  }
  if (pos.y > floorY2) {
    Ball.SetPositionY(floorY2)
    speedY = speedY * -bounce
  }
  wait(0.01)
}
Now preview the publication. The ball should now drop down and to the right, then bounce off the right-hand wall. The ball should then travel to the left, before bouncing off the left-hand wall.
However, if you continue watching the preview you should notice that when the ball stops bouncing, it does not come to rest, but instead rolls left and right across the bottom of the screen. We therefore need to implement a way of simulating 'friction' which would normally cause the object to stop rolling.
To simulate friction, we need to reduce the horizontal speed (speedX) of the ball each time it hits the floor. The easiest way to do this is to multiply speedX by bounce. Please note that we are multiplying by positive bounce rather than negative bounce as we do not want to reverse the ball's horizontal direction, only to slightly reduce the ball's speed in the current direction. Please edit:
if (pos.y > floorY2) {
  Ball.SetPositionY(floorY2)
  speedY = speedY * -bounce
}
to read:
if (pos.y > floorY2) {
  Ball.SetPositionY(floorY2)
  speedX = speedX * bounce
  speedY = speedY * -bounce
}
The full code will now read:
floorX1 = 25
floorX2 = 775
floorY1 = 25
floorY2 = 575
speedX = 10
speedY = 0
gravity = 1
bounce = 0.9
while (true) {
  speedY = speedY + gravity
  Ball.Move(speedX,speedY)
  pos = Ball.GetPosition()
  if (pos.x < floorX1) {
    Ball.SetPositionX(floorX1)
    speedX = speedX * -bounce
  }
  if (pos.x > floorX2) {
    Ball.SetPositionX(floorX2)
    speedX = speedX * -bounce
  }
  if (pos.y < floorY1) {
    Ball.SetPositionY(floorY1)
    speedY = speedY * -bounce
  }
  if (pos.y > floorY2) {
    Ball.SetPositionY(floorY2)
    speedX = speedX * bounce
    speedY = speedY * -bounce
  }
  wait(0.01)
}
Now preview the publication - the ball should bounce around the page and come to a complete standstill.
In the next tutorial, we will see how we can grab the ball in mid-air and throw it around the page, setting its initial speed and direction.
tutorial to create a bouncing ball simulation in Opus Pro